Showing posts with label DIY. Show all posts

Sunday, November 1, 2015

Fall Yarn Wrapped Wreath Tutorial

DIY Crush Link Party


I don't know if you can call this a tutorial - really it's just an explanation of how I did this. I thought it turned out much prettier than I expected and then thought someone else might like to try their hand at this super, simple wreath:

Fall Yarn Wrapped Wreath:


Displaying 29b887ec-ac39-4645-8e04-efa6b5315130.jpg

Friday night I couldn't sleep. That's not been unusual for me lately. For some reason I just lie there awake. Anyway I ended up staying up till 3:30 am working on this little project. Why? Because I cant find my usual Fall wreath that I made a few years ago. 

I've been using this wreath that I had made up years ago. I'm afraid I didn't take a before picture. As tired as I was that would of been to easy to think of. Here is what I did:

Materials:

  • An old ball of  yarn that you had attempted to make into something neat.
  • An old wreath that uses a styrofoam circle (Or a new one if you prefer)
  • Decorations: I used an old flower clip that I would pin on my cordoroy jacket that was broken and 2 pinecones I found at Dollar Tree the week before. I was going to use them for photographing items for my etsy store and they were just lying around because they didn't work.
  • Hot Glue Gun and Glue Sticks
Instructions:
1) (If you already have your materials and don't need to dismantle an old wreath, skip this step.) I began by having 4 almost 5 year old Maddie help take the garland of posies that I had wrapped around a styrofoam circle (which you can see in the collage above) for my spring wreath off as carefully as she could. While she was doing this the 22 month old stood there and kept telling us it was a CIRCLE!
2) Take ball of yarn (this is a yarn I picked up from Joann Fabrics and I THINK it's from the line of yarn based on paintings??? I drooled over it until it finally went on sale and grabbed a ball of it.) Wrap it around and around and around the styrofoam circle. I worked on this when I had NO kids to keep distracting me - I ended up working on it while watching Hobbit 3 I think finally finishing about 3:30 am. 
3) Figure out what decorations you want to use. I knew I wanted to use one of my clip flowers early on in the wrapping stage although I was originally going to use a White/Cream Wool Flower I had picked up at a craft show. When I was all finished I realized that the burgundy flower was a perfect match for it & adding the pinecones was a fun way to finish it off. Really it doesn't need the pinecones and I'll probably remove them and stick them back on the Christmas Tree that is already up with the ornaments I had purchased for the photography session that didn't use them.

Well, that's all folks. It's a very easy project. The important thing is to stick with it and make sure you wrap tight and keep the yarn from overlapping as you wrap the CIRCLE. I just kept gently pushing them against the strand wrapped just before the current one. 

I'm going to try a cream wreath for the holidays next. I saw a really neat one on Pinterest that uses those cute snowflakes that have glitter all over them. Maybe I'll have the 4 almost 5 year old make one - she'll think it's a FROZEN wreath!

Before you go, be sure to check out my giveaway (just click the image to go there):

Linked up @ 

Monday, September 28, 2015

Tot School Fall Sensory Activities


We are now heading into October (yay!) and Gianna is getting so big. She is loving Tot School and I have been trying to incorporate more sensory activities like Pumpkin Playdough, hunting for acorns & colorful leaves and this fun sensory box.

Materials I used:
  • Various plant picks with leaves, pumpkins, scarecrows, etc from the fabric store (Joanne's has a nice selection)
  • We used last months oatmeal but you could use corn, hay, acorns, birdseed, etc
  • leaf shaped serving trays from Dollar Tree
I began by purchasing 6 fall picks from the floral section at Joanne Fabrics. 
Having 2 girls meant having to get 2 of everything. Pumpkins (these could
also be used for graduating size activities), Scarecrows, Flowers (Mums in 
this case). There were lots of leaves on all of them.


I pulled off all the pumpkins, leaves & flowers. The Scarecrows stayed 
on the pick as I didn't have any wire cutters. I just watched Gianna to
make sure she wasn't poking someone's eyes out or trying to chew on them.


I found these neat leaf shaped trays at Dollar Tree for $1 and they are the 
PERFECT size for a high chair tray. They don't hold much I don't quite trust 
her on the floor not to be carrying it all over the place but still for a 
toddler they are a nice size.


Throw in a little bowl and a spoon or two and she is happy 
for a good 1/2 hour to hour at a time (sometimes longer)!

MrsAOK, A Work In ProgressInspire Me Monday  photo meanderingmondaybadge1014200x200_zps679d2e71.png My Pinterventures   Thursday Favorite Things Button God’s Growing Garden “Inspire

Tuesday, January 10, 2012

Bathroom remodeling?

Imagine - Wallpaper with big orange and yellow flowers and a metallic brown background. Yellow 'tiled' flooring in 12" squares that 'stick' on the concrete floor ('stick' means it's not sticking so well anymore) and a brown cheap vanity with flourescent bulbs around the medicine cabinet. Yes, I need a new bathroom!


Balinese Influenced Bath asian bathroom


Bathroom Design is so versatile now. You can really do just about anything you want. Houzz.com has a page dedicated to bathroom remodeling and lots of photos to give you ideas. I spent a little time dreaming and I'd love to have a bathroom with that huge shelf behind the tub (tub will definitely need jets and be 'deep' for soaking) and this vanity and mirror. I think the only thing I would do differently was to lower the mirror a little and have the lighting over the mirror not on the side.


Alexandria Residence contemporary bathroom


I like the darker look and would do a Italian marble or perhaps aqua's and creams with a seaside design.Be sure to go to houzz.com and set up your style book to help you with your design plans. Or you can set up a blog page of your own and start a little dreaming of your own.

Thursday, December 15, 2011

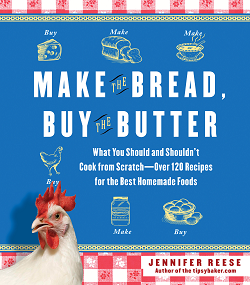
Make the Bread, Buy the Butter ~ Book Review & Giveaway

Make the bread buy the ButterMake the Bread, Buy the Butter
by Jennifer Reese
ISBN: 9781451605877
304 pages, $15.53 Hardback
What you should and shouldn't cook from Scratch - over 120 recipes for the best homemade foods. This book is exactly that. 

About the Book:
When Jennifer Reese lost her job, she was overcome by an impulse common among the recently unemployed: to economize by doing for herself what she had previously paid for. She had never before considered making her own peanut butter and pita bread, let alone curing her own prosciutto or raising turkeys. And though it sounded logical that “doing it yourself” would cost less, she had her doubts. So Reese began a series of kitchen-related experiments, taking into account the competing demands of everyday contemporary American family life as she answers some timely questions: When is homemade better? Cheaper? Are backyard eggs a more ethical choice than store-bought? Will grinding and stuffing your own sausage ruin your week? Is it possible to make an edible maraschino cherry? Some of Reese’s discoveries will surprise you: Although you should make your hot dog buns, guacamole, and yogurt, you should probably buy your hamburger buns, potato chips, and rice pudding. Tired? Buy your mayonnaise. Inspired? Make it.

My thoughts:
I can personally say I have made pumpkin soup using an actual pumpkin - bagels too. What can I say? I was bored and young and decided to give it a try. The bagels turned out pretty good. I've actually made them twice. I've also made biscotti, coconut creme pie WITH merengue and bread. I don't remember if I liked the pumpkin soup - but I can say I've made it at least once.


I love to sit down and "read" cookbooks. Make the Bread, Buy the Butter does what I've often wondered - is it really beneficial for me to make my own bread, ice cream, granola or mozzarella? Other than the fact that it's not processed, doesn't have added chemicals, and I can control what "additives" are in it.

There are some great stories included in the book about why and what made her decide if a recipe was worth doing or passing the next time. 

There is a great section for Barbecue! I love barbecue - there's the spice rub, the vinegar sauce, and a yummy looking Dr Pepper barbecue sauce (I'm hungry can you tell?). Or you could make Duck Prosciutto - but according to Jennifer you should just buy it - it's a real hassle if sounds like (I'll definitely pass on this one).  

Along with over 120 recipes and great stories of Jennifer's experience writing this book and all her research - you'll also learn why you should make your hot dog buns & buy the hamburger buns (?).

Purchase Make the Bread, Buy the Butter on Amazon - click here

Giveaway
I have a copy of Make the Bread, Buy the Butter to giveaway! Just click here to enter the drawing for both this book and The Ice Dream cookbook. You can keep both for yourself - or give one away and keep one - or give both away. You decide!

Follow Jennifer @:
Twitter: @JenniferReese
Facebook: https://www.facebook.com/TheTipsyBaker

Much thanks to Simon & Schuster for donating a copy of Make the Bread, Buy the Butter to review and another to giveaway! I wasn't paid for my opinion and I wasn't required to write a positive review.